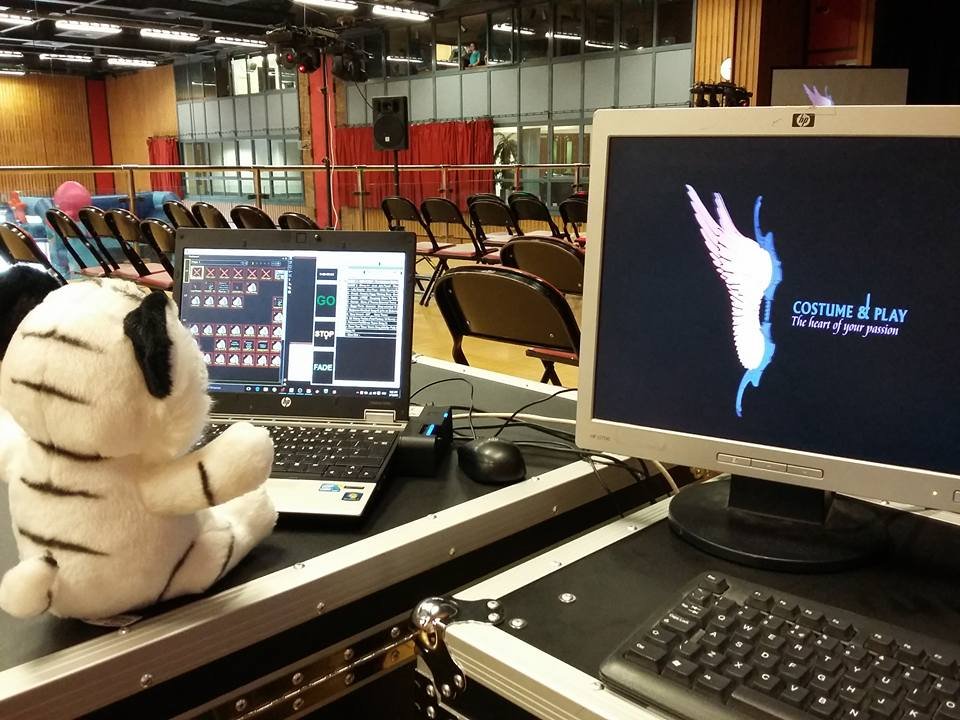
Masquerade Audio
So you’ve built your Cosplay, chosen the Masquerade you want to enter, planned your stage skit and everything is looking amazing. Then you spot a request on the entry form for an MP3 file or YouTube link. What are you supposed to do with that?
Creating an audio track, like any creative process, can be done in a variety of ways. There aren’t any “right” or “wrong” answers. However, some techniques are known to work better than others.
Planning
There are a few considerations to make before creating your audio track :-
Firstly, are you miming to something pre-recorded or asking the Masquerade if they can give you a microphone? If you plan to act live, you will NEED a mic. Trust me, even your voice will struggle against the racket of 1000+ people, loud music and the sounds coming from other stands in a large, echoey hall.
Also, not all Masquerades have microphones available to cosplayers. Those that do, commonly have handheld Mics that are used by the MCs. Meaning it can be harder to act while having to hang on to a mic. Remembering to speak into it. Not knocking it against something. Not pointing it at the speakers or doing anything else that will make the stage crew grumpy. Headset style “Madonna Mics” are possible but tend to be rare. They also tend pick up everything and are very sensitive to being knocked. So be aware of this if your skit is going to be energetic.
It also goes without saying that using a Microphone while wearing a mask of any kind is a bad idea. Your beautiful voice will sound as if you’re speaking through the multiple layers of cloth, foam or whatever else is in your cosplay. In short, muffled…
If you plan to mime to a premade track, you will have to keep the timing of your skit in mind. If you have a blooper, the audio will likely continue even if you don’t! The length of your skit will also be watched very closely by the stage crew. Most Masquerades have a time limit per skit. Usually around 1:30 – 2:00 minutes. Check with the masquerade organisers if you’re not sure.
If you go over the limit, the audio and lighting will probably be pulled out from under you. Make sure that everything you want to do happens and you’re leaving the stage before then!
Sourcing Audio
All recorded media works on something I call “SIBSO”.
“S*** In, BullS*** Out”.
It means that your end result is only ever as good as the ingredients you put into it at the beginning. The idea of a Blade Runner-esque “Zoom and Enhance” or some fancy computer program picking out a single voice among thousands in the background of a scratchy telephone recording are utter science fiction. At least at the beginning of the 21st century.
If your source audio is low quality, your completed track will be low quality. You will have no chance to “fix it in the mix”. Therefore, you need to find or create the highest quality versions of whatever music, voices and sound effects you want to use, before mixing them together to create your track.
In technical terms, you will likely find what you need from a whole variety of places. Cosplay and copyright have always skirted a rather grey area though. So be careful.
The game, show or movie itself is the most obvious. Games in particular often have music files hidden amongst the install, or available through a sound test menu or gallery. You may even be able to purchase the game music as an OST (Original Soundtrack).
It’s common for many to download media from streaming and VOD sites like YouTube or Daily Motion. Quality can vary but it’s surprising what you can find with a little searching.
Be aware that downloading or “ripping” from these sites is usually against their terms of service. So I can neither condone the practice nor tell you how to do it. However, I won’t stop you and I suggest you make sure that whatever website or software you use is trustworthy. Not all of them are.
Another possibility is recording your own lines and adding them to the track to be mimed with later. This can be useful if the character you are cosplaying doesn’t say any of the lines you want to use in your skit. It’s also a good way to get around the live microphone issues I mentioned earlier.
Recording
Recording is literally an art in itself, but there are a few basics that will get you good results.
First, find a quiet room with as little background noise as possible. Also make sure there is as little echo or reverberation as possible. You want a room that sounds as “dead” as you can get. Effects can be applied to the recorded voice later but you want a clean recording to get the best results before that. While a posh home studio is an asset, they are also a luxury. It’s not unknown for professional voice actors to hang thick curtains inside a closet and record to a laptop for a quick audition or filler piece! In this way, the end result is more important than what you used to record it.
A decent microphone is crucial (remember, SIBSO!), but, again, you don’t necessarily have to drop a bag of money for the latest streaming or studio kit. A high quality gaming headset will usually have a good enough microphone. In a pinch, a modern smartphone with a recording app could also potentially work. I’ve done this myself when the need arose but I was already at an event. Though be aware of the kits limitations. They are usually designed for communication. Not high quality recording…
Whatever you end up using, place the microphone a couple of inches in front and above your mouth. The idea is to capture the sound of your voice, but keep the microphone away from the stream of air coming from your mouth and nose. Avoiding the popping sounds (“Plosives”) you naturally make on the letters P and B and the hissing sounds (“Sibilance”) you get when pronouncing the letter S. A common trick for this is to put a “pop filter” between you and the microphone. At their most basic, they are just a small frame holding some high dernier stocking material. A stand or solid mount is also preferable to hand held, but use what you can.
Next, say a couple of lines and watch your recording device or software. There should be a dancing meter that is measuring the audio as it goes in. You want that meter to be a little under three quarters of the way through its swing. If recording to digital, approximately -15db to -20db. For analogue, a little under “0” (aka “Unity”). Give yourself headroom and try to avoid maxing out the meter or “clipping”. Clipping will distort the audio and sound terrible when played through the stage rig at the masquerade.
Once you are happy with the levels going into your recording, the next step is to press the big red scary button marked “Record” and go for a take.
Press “Record” and stand quietly for a few seconds, you’ll need these few seconds of “silence” for noise reduction purposes later. Then say your lines and give your performance. Afterward, stand quietly for a few more seconds before pressing “Stop”. Don’t be afraid to do this several times until you record the best take possible. You may also find later on that you prefer the delivery of particular lines from particular takes and end up piecing together a patchwork of the good bits. The more takes you record, the more options you have during the editing process.
Editing
I’m going to use a program called “Audacity” for these examples. It’s freely available and the most common I’ve seen used by Cosplayers. However, there are a number of audio editing suites out there and the same basic principles work for all of them.
First step is to open your software and import your audio. Be this your own recordings or whatever backing tracks you have sourced earlier.
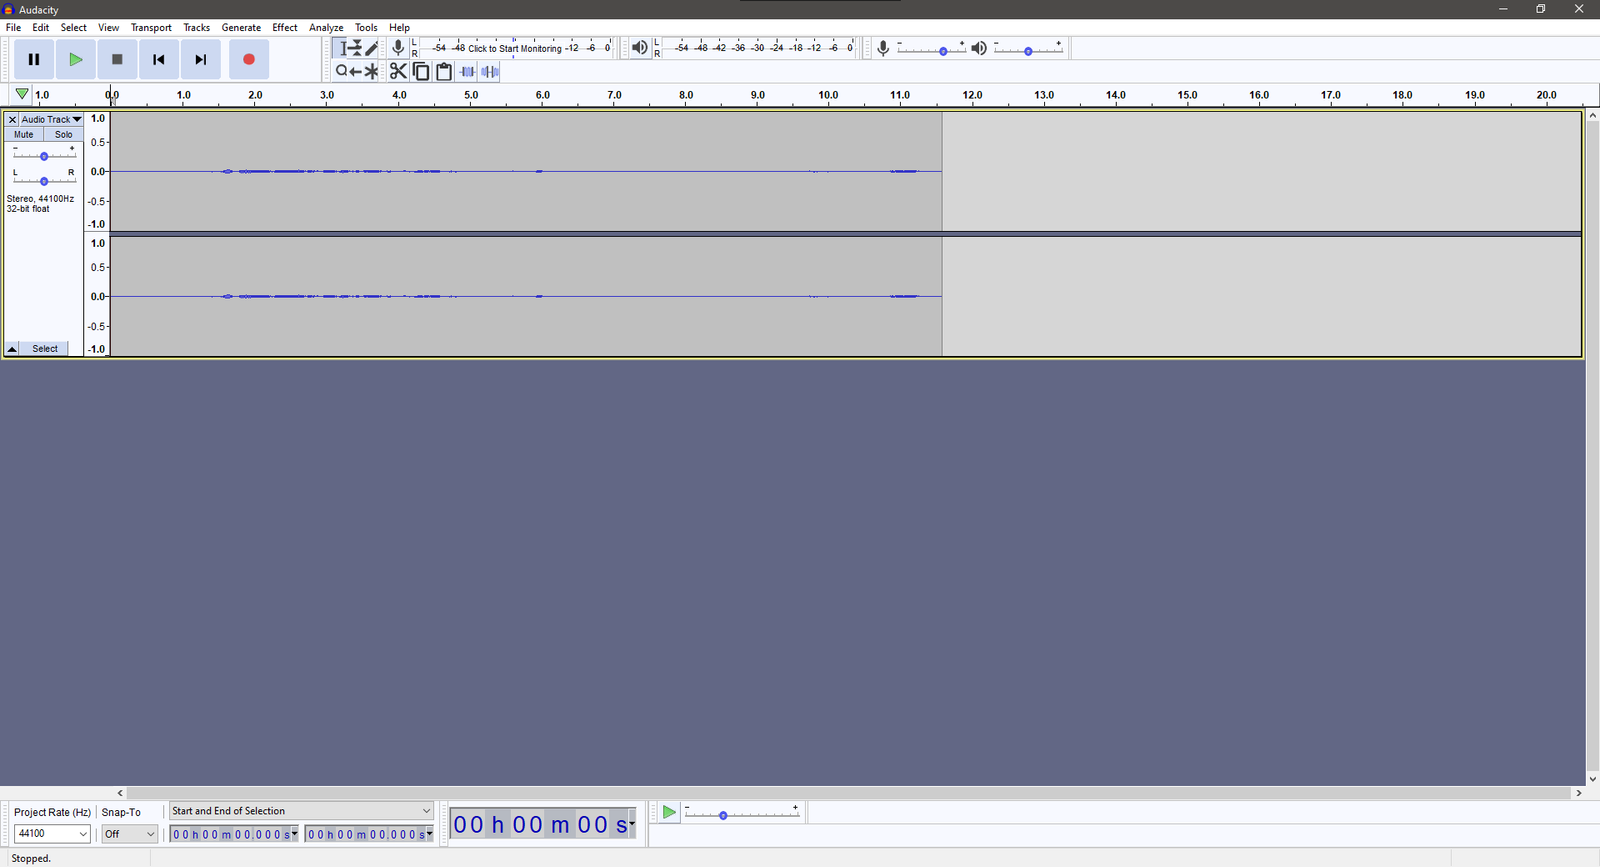
You may notice that your recordings appear as very thin lines within the editor. They will also sound very quiet when played back. To fix this, we need to normalize the audio. You will likely have to normalize all of the audio you intend to use. However, you’ll get better results by doing each track individually.
Select the Audio you’re working on and then select “Normalize” from the effects list.
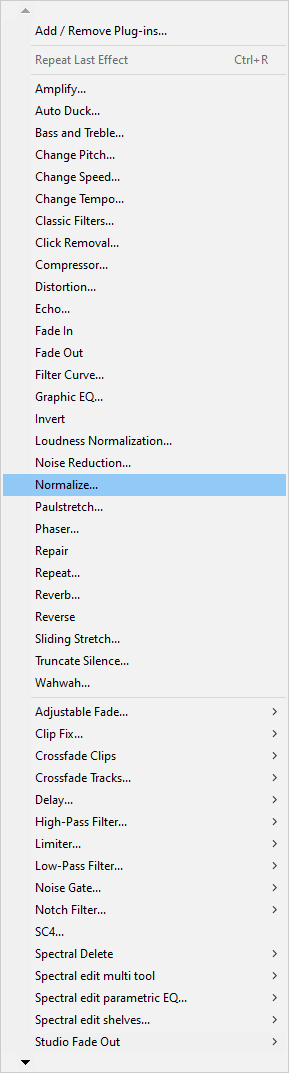
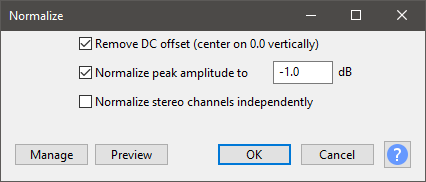
Normalisation amplifies the track until its highest peak hits the set limit. In this example -1.0dB. Bringing the overall levels of each track closer together and uniform. Very handy if you plan to have your own voice placed over a music track that may have already been heavily compressed and amplified beforehand!

The next thing to do is run a noise reduction filter over the recorded audio.
Noise reduction works by creating a profile based on a recording of the room itself (remember how you hit record and waited a few seconds before speaking earlier?). That profile is then applied to the entire track. To hopefully remove any unwanted ambient sounds from the background.
Find a quiet section of your recording and select it. Then click “Get Noise Profile” within the plugin window. Try to get at least a few seconds. The larger the profile, the better the end result.
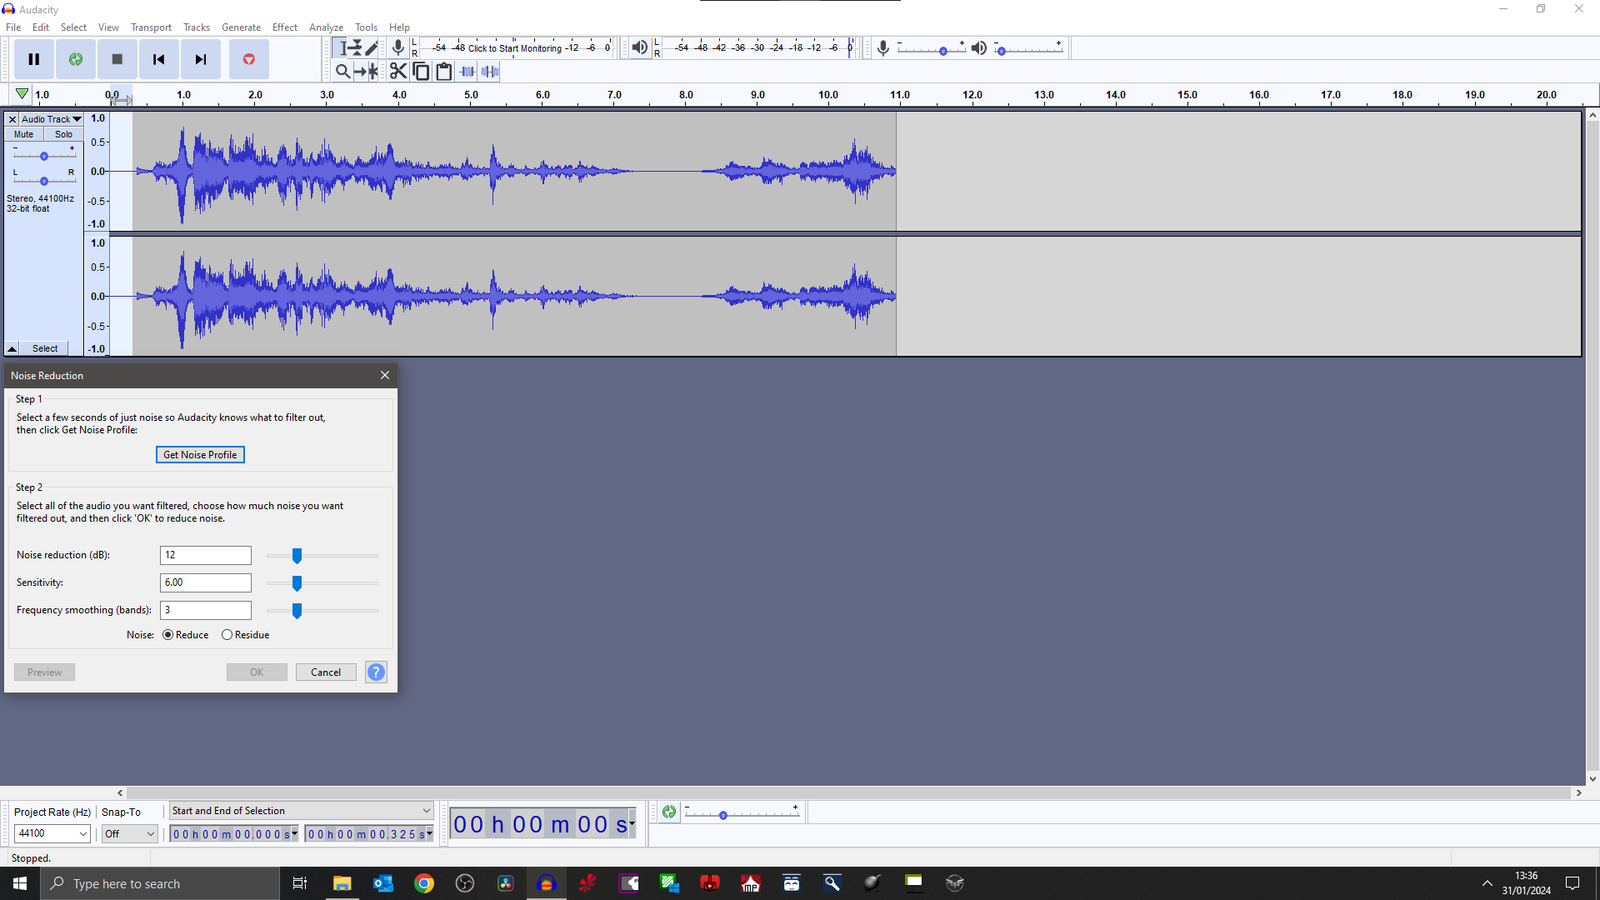
Once you have the profile. Select the entire recording and apply the noise reduction to it. If everything has gone to plan, the areas between each of your lines should flatten significantly. Make sure to play back and check that your audio is still sounding the way you wish it to! Noise reduction can be known to take out too much, especially if the noise profile has been badly captured. If that happens, you’ll have to go “Back” within the edit list and try again.
You should hopefully now have a small library of normalized and noise reduced music and voice clips. The next step is the fun, creative, part of the process. Editing everything together. In most audio software, this can be as simple as clicking and dragging the blocks of audio around as if building a jigsaw puzzle.
Like before, there aren’t any right or wrong answers on how you put together your track. But there are some techniques and tricks that work better than others.
- Have a plan and stick to it. Have an idea in your head for what you want it to sound like and then work to create that sound.
- Use multiple tracks within the editor, rather than trying to mash everything together on a single track. Especially if you’re moving back and forth between music and spoken lines.
- FADE, FADE, FADE! Even if only for a fraction of a second, fade every clip in and out. It will keep your completed track clean and avoids the choppiness that can occur when you straight cut sections not originally intended for each other.
- Keep the overall sound level consistent. While it could be exciting/funny to scare the crap out of your audience with a quiet section followed by a massive explosion. It will more likely just get the audio cut by the stage technicians, trying to protect the rig. As with other parts of the masquerade, NEVER SURPRISE THE STAGE CREW!
- SAVE, SAVE, SAVE! Save regularly until Ctrl+S becomes a nervous tic! The last thing you want to have is a crash after spending hours on your masterpiece!
Once you have the completed edit. Render/Export it to the file format requested by the Masquerade. MP3 and WAV are the most common. Then take it to your Car or a HiFi in your house and play it back. NEVER trust the sound coming out of your phone, because the tiny speaker on it will be vastly different to the stage speakers at the Masquerade. Professional studios have been “Car-Testing” audio for decades. If it sounds good there, it will likely sound good on stage.
… And that, as they say, is that. May your costume wow the Masquerade judges, your soundtrack wow the audience and the trophies come flying your way.
Break a leg but not the rig… >~.^<
![]()